DMC Natura Just Cotton Denim yarn has given me yet another idea for a crochet bag. This fine quality yarn from Italy is perfect for my Denim Bag.
This one is easy to make, even if you decide to add lining.
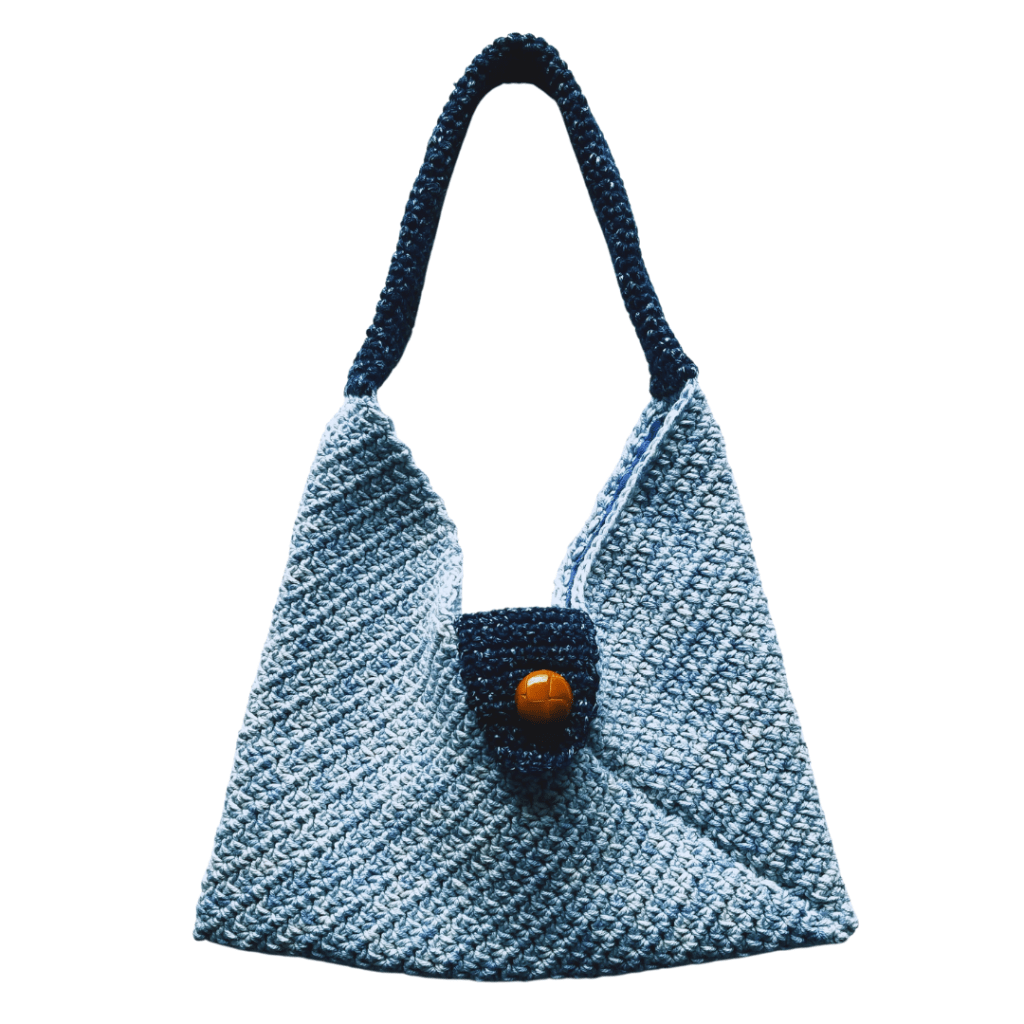
If you have followed my blog you can tell by now that I really like bags and purses. I’ve noticed some pretty crochet bags in stores lately, so it seems like a right time to make one of our own.
I’m happy to share this video tutorial to crochet the cute denim bag. And below you will find step-by-step instructions and helpful tips to complete the project. I also show you how I line the bag to make it sturdy for everyday use.


VIDEO TUTORIAL OF DENIM BAG
Leilonni Hamilton Really cute bag! Can’t wait to make it. Thanks for showing how to put it together. I am glad that you made this tutorial.
Chi Nguyen Your project looks really cute! And I like the way you teach, very detailed and helpful. Thanks so much for your tutorial.
WRITTEN PATTERN OF DENIM BAG
If you prefer ad-free printable PDF pattern, you can get it on:
You will need 3 balls of main color (light blue) and 1 ball of contrast color (dark blue) of DMC Natura Just Cotton Denim. And use crochet hook size 4.5 mm for main yarn and 3.5 mm for contrast yarn.
Abbreviations:
ch = chain
hdc = half double crochet
sl st = slip stitch
sc = single crochet
- With main color (leave a long tail appr. 45 in) and ch 31, hdc in second chain from hook and each next chain – total 30 hdc.
- Ch 1, turn and hdc 1 between each hdc of previous row – total 30 hdc.
- Repeat row 2 until you have total of 80 rows. The peace will measure appr. 8.5 in wide and 23.5 in long. It’s ok if your piece measures differently, just follow the video before cutting off the yarn to see how long your piece needs to be for folding.
- Fasten off and again leave a long tail to be used for stitching.
- Optional – cut a piece of fabric slightly larger than the yarn piece and attach it to the main piece with pins. Fold the corners backwards on both corners that are opposite from corners with tails (see the video for illustration). Stitch the fabric and yarn piece together.
- See the video for folding illustration, as well as attaching the correct edges and stitching technique.
- Handle – with contrast color (leave long tail for stitching) ch 11 and sl st in first ch to form a ring. Sc in each ch and keep single stitching in each st, there is no end or beginning of rows, just continue crocheting until the handle measures appr. 15 in long. Fasten off and leave quite a long tail.
- Fit the corners with folded fabric into the handle holes and attach with pins. Use the tails of handle and stitch through the handle edge and corresponding loops on bag (see video for illustration).
- Flap – attach contrast color yarn in the middle of front corner of the bag with single crochet stitch. Slip stich into the edge of bag, turn and sc in sl st, sc in sc of previous row and sc into the other edge, then sl st into that same edge. Turn and skip sl st, sc in each next 3 sc, also sc into the edge, then sl st into the same edge. Turn and repeat this sequence until you have 10 sc.
- Ch 1 and sc 1 in each 10 sc, repeat this for 8 rows. Then ch 1, sc 1 in each next 3 sc, ch 4 and skip 4 sc for button hole, sc 1 in each next 3 sc. Turn and ch 1, sc 1 next 3 sc, sc 3 in chain space, sc 1 in next 3 sc. Next row decrease as follows – turn and skip 1st sc, sc 1 in each next 5 sc and sc 2 together for last st (total 7 sc on this row). Turn and ch 1, sc 1 in each 7 sc. Turn and skip 1st sc, sc 1 in each next 4 sc and then sc 2 together for last st (total 5 sc on this row). Turn and ch 1, sc 1 in each 5 sc. Fasten off. Weave in all ends.
- Find the best place for button on the opposite side and sew it on.
If you enjoyed making this bag, check out all my crochet bag tutorials.
Happy crocheting!
COPYRIGHT:
You may not sell my pattern or claim it as your own.
You may make items to sell (i.e. on Etsy, at craft fairs) from my pattern but I ask that you link back to my blog handmadebyraine.com and provide credit for the pattern.
You are welcome to share my pattern on social media as long as you link back directly to my blog post (providing the link). No copy & paste of my pattern will be allowed under any circumstances.
Some links are affiliate, meaning I’ll make a small commission if you make a purchase, but this is at no cost to you.






6 Comments
Hi, if i wanna make it bigger what shld be the number of chains for the foundation & how many rows in total? TIA!
Hi Pauline! I haven’t made this bag in bigger size yet, so I don’t have exact stitch count for you but you can definitely experiment and depending on your work tension you can add stitches and rows to make the preferred size of bag. I am planning to make the same bag bigger for beach bag size and I can then let you know. But I won’t be able to make until the summer. Best, Raine