


Spiral Cobweb is easy to crochet using two colors of thread and spiral crochet technique. I love it because I use both colors simultaneously without cutting them off after each round, and that means I don’t have to weave in millions of ends when it’s finished.


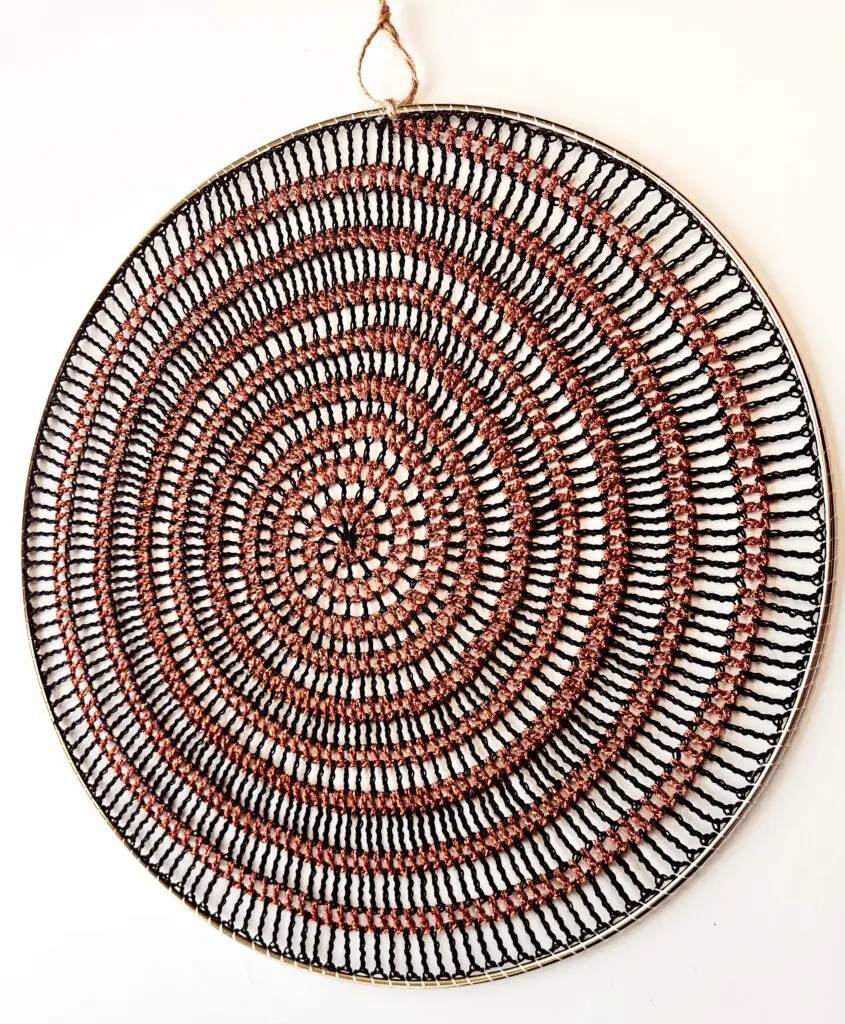
In my video tutorial I will also show you how to attach the crochet piece to 16-inch metal hoop for hanging your Spiral Cobweb on the wall.
VIDEO TUTORIAL OF SPIRAL COBWEB
WRITTEN PATTERN OF SPIRAL COBWEB
If you prefer ad-free printable PDF pattern, you can get it on:
I use 2 colors of thread to crochet the Spiral Cobweb: my first color is Aunt Lydia’s thread size 10 (color A) and second color is Anchor Artiste Metallic thread (color B). I like to use metallic thread because it’s perfect for adding a touch of shimmer to my cobweb. Anchor Metallic thread has 25g in one ball and it’s enough. The size of this thread is not specified but it used crochet hook 2-3 mm. My crochet hook is size 2.25 mm. You will also need stitch marker, 16-inch hoop, 0.5 mm clear stretchy cord and sewing needle.
Abbreviations:
ch = chain
sl st = slip stitch
sc = single crochet
hdc = half double crochet
dc = double crochet
tr = triple crochet
dtr = double triple crochet
- With color A ch 5, sl st in 1st ch to make a ring.
- Round 1 = with A ch, sc + ch + hdc + ch + dc + ch + dc + ch in the ring, insert stitch marker in color A working loop, continue with B and join it with sc in the ring, then ch + hdc + ch + dc + ch + dc + ch in the ring.
- Round 2 = with B (dc+ch2+dc, ch) in next 3 ch-spaces of color A, take stitch marker out of A loop and insert in B loop.
- Round 3 = with A ch, (dc, ch2) in each color B ch-space, insert stitch marker in A loop.
- Round 4 = with B (dc+ch2+dc, ch) in each color A ch-space, insert stitch marker in B loop.
- Round 5 = with A (dc, ch2) in each color B ch-space, insert stitch marker in A loop.
- Round 6 = with B ((dc+ch2+dc, ch) in each color A ch-space, insert stitch marker in B loop.
- Round 7 = with A (dc, ch2) in each color B ch-space, insert stitch marker in A loop.
- Round 8 = with B (dc in next ch-space, ch, dc+ch2+dc in next ch-space, ch) repeat, insert stitch marker in B loop.
- Round 9 = with A (tr, ch) in each color B ch-space, insert stitch marker in A loop.
- Round 10 = with B (dc in next ch-space, ch, dc+ch2+dc in next ch-space, ch) repeat, insert stitch marker in B loop.
- Round 11 = with A (tr, ch) in each color B ch-space, insert stitch marker in A loop.
- Round 12 = with B (dc, ch2) in each color A ch-space, insert stitch marker in B loop.
- Round 13 = with A (tr, ch2) in each color B ch-space, insert stitch marker in A loop.
- Round 14 = with B (dc in next ch-space, ch, dc+ch+dc in next ch-space, ch) repeat, insert stitch marker in B loop.
- Round 15 = with A (dtr, ch) in each color B ch-space, insert stitch marker in A loop.
- Round 16 = with B (dc, ch) in each color A ch-space, insert stitch marker in B loop.
- Round 17 = with A (dtr, ch) in each color B ch-space, insert stitch marker in A loop.
- Round 18 = with B (dc, ch) in each color A ch-space until last 2 ch-spaces, hdc in next ch-space, ch, sc in last ch-space, cut off and fasten off color B.
- Round 19 = with A ch, (dtr, ch2) in each color B ch-space until last 11 ch-spaces, (tr in next ch-space, ch2) 3 times, (dc in next ch-space, ch2) 3 times, (hdc in next ch-space, ch2) 3 times, (sc in next ch-space, ch2) twice, sc in color A ch-space, cut off and fasten off color A.
- Weave in all ends.
ATTACH TO HOOP
My cobweb measured about 14.5 inches in diameter after finishing and it was just the right size to stretch it onto the hoop. I cut the stretchy clear cord about twice the diameter of the hoop (or a little longer even). Using a sewing needle and the cord I first inserted the tail end of cord through one of the ch2-spaces as well as the hoop and secured it with a knot. Then I weaved the cord around the hoop inserting needle through each ch2-space, making sure the cord was tight around the hoop. When finished weaving, I tied a knot with the tail end and weaved in the ends of cord. I used about 7-inch long jute cord to attach the hanging loop. First I tied a knot around the hoop, then another knot with end tails, then trimmed the tails.
Check out all my Halloween crochet projects:
- Crochet Skull
- Spiderweb Tablemat
- Spiderweb Mason Jar Cover
- Cat Hat
- Halloween Spiderweb
- Black Cat Table Runner
- Little Spider Tablecloth
HAPPY CROCHETING!
COPYRIGHT:
You may not sell my pattern or claim it as your own.
You may make items to sell (i.e. on Etsy, at craft fairs) from my pattern but I ask that you link back to my blog handmadebyraine.com and provide credit for the pattern.
You are welcome to share my pattern on social media as long as you link back directly to my blog post (providing the link). No copy & paste of my pattern will be allowed under any circumstances.
Some links are affiliate, meaning I’ll make a small commission if you make a purchase, but this is at no cost to you.


