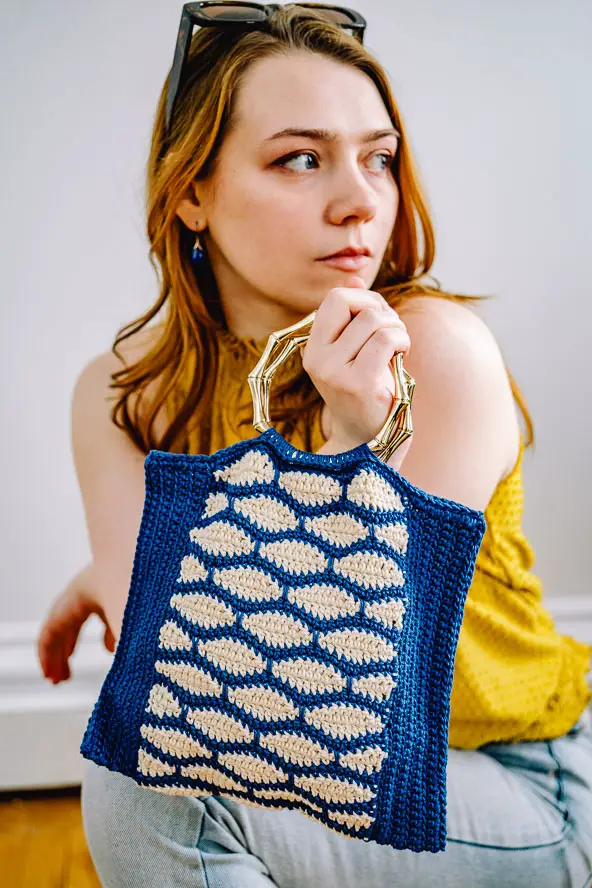
Join me in crocheting the adorable Polka Dot Bag that’s both practical and full of personality! With the right yarn and technique, you can create a charming, eye-catching bag that stands out. Start by choosing a base color and a contrasting shade for the polka dots—soft pastels for a delicate look or bold hues for a vibrant statement.


Whether you’re making it for yourself or as a gift, this project is a fantastic way to show off your creativity and crochet skills. Plus, handmade bags always carry a little extra personality!

VIDEO TUTORIAL OF POLKA DOT BAG
WRITTEN PATTERN OF POLKA DOT BAG
If you prefer ad-free printable PDF pattern, you can get it on:
Materials:
- I used Easy Peasy Yarn by the Woobles. The size of the yarn is medium 4, the contents is 75% cotton and 25% nylon. One ball has 164 yds/150 m and the purse requires 1 ball of color A (the dots) and 2 balls of color B.
- The crochet hook is 4 mm.
- And if you would like to use the same metal handles, you can get them on Amazon.
Finished size:
My bag measures about 10.5 inches wide and 9 inches from top to bottom. You can make the bag bigger by using thicker yarn and a bigger crochet hook.
Abbreviations:
ch = chain
dc = double crochet
sl st = slip stitch
beg = beginning
tr = triple crochet
hdc = half double crochet
yo = yarn over
sc = single crochet
Pattern notes:
– The bag is made of 8 squares that are attached with slip stitches, and it’s finished with additional stitches around the edge. The handles are added with slip stitches while crocheting the edge.
– Please see the video tutorial for additional help, especially with joining the pieces with slip stitch technique.
SQUARES (make 12)
- With color A make a magic ring:
- Round 1 = ch 3 (counts as 1st dc), dc 11 in the ring (12 dc), sl st in 3rd beg ch.
- Round 2 = ch 3 (counts as 1st dc), dc in same st, dc 2 in each st (24 dc),
- join color B: with color A loop on hook, insert hook through 3rd beg ch, then insert through slip knot of color B and pull it through the loops on hook, cut off color A.
- Round 3 = ch 4 (counts as 1st tr), tr in same st, dc in each next 2 dc, dc 3 in next dc, dc in each next 2 dc, (tr 3 in next dc, dc in each next 2 dc, dc 3 in next dc, dc in each next 2 dc) three times, tr in beg st, sl st in 4th beg ch.
- Round 4 = ch 4 (counts as 1st tr), tr in same st, dc in each next 3 st, hdc in next dc, hdc 2 in next dc, hdc in next dc, dc in each next 3 st, (tr 3 in next st, dc in each next 3 st, hdc in next dc, hdc 2 in next dc, hdc in next dc, dc in each next 3 st) three times, tr in beg st, sl st in 4th beg ch.
- When finished with 1st square, cut off and fasten off color B.
- When finished with each next square, don’t cut off yarn.
- Follow the next steps to join the squares.
JOINING SQUARES
- Insert hook from front to back through back loop of corner tr on right square, then insert hook from front to back through back loop of corner tr on left square, yo and pull through all loops on hook.
- Sl st in back loops of stitches on both squares (14 sl st) same way, cut off, fasten off yarn.
- Join 3rd square with 14 sl st same way to form a panel, cut off and fasten off yarn.
- Make 2nd panel same way, don’t cut off yarn after joining 3rd square.
JOINING PANELS
- Follow the blue arrow (1) on the graph to join first 2 panels with 14 sl st.
- Make the 3rd panel, don’t cut off yarn after joining 3rd square, join the panel to first two following the blue arrow (2) with 14 sl st.
- Make the 4th panel, don’t cut off yarn after joining 3rd square, join the panel to first three following the blue arrows (3 and 4), don’t cut off yarn.

- Fold the piece to hold the long sides of 1st and 4th panels together and starting from the corner with your working loop, sl st through the sides of both panels same way as before, following the green lines (1) on the graph, cut off, fasten off yarn.
- Join yarn in corner of 1st and 2nd panel, sl st through the sides, cut off, fasten off yarn.
- Join yarn in corner of 2nd and 3rd panel, sl st through the sides, cut off, fasten off yarn.
- Join yarn in corner of 3rd and 4th panel, sl st through the sides, don’t cut off yarn.

EDGE AND HANDLES
- Sc3tog inserting hook though same st, then through sl st joining 2 squares, then through tr (before dc) on the next square, yo and pull through 4 loops on hook.
- Sl st 10 along the side of next square.
- Place the handle behind the corner tr stitches:
- Insert hook through 1st tr, then through the hole on handle, yo and pull through the hole and loops.
- Sl st in next tr without inserting hook through handle hole.
- Sl st in next tr inserting hook through tr, then through the hole on the handle, yo and pull through the hole and loops.
- Sl st 10 along the side of next square.
- Sc4tog inserting hook through tr, (through sl st joining 2 squares) twice, through next tr, yo and pull through 5 loops on hook.
- Repeat steps 2-5 for the first handle.
- Repeat steps 2-5 with the second handle, then repeat steps 2-4 with the second handle.
- To finish the edge: sl st inserting hook through tr and beg sc3tog, cut off, fasten off yarn.
- Weave in all ends.
Check out all my crochet bag tutorials & patterns here.
HAPPY CROCHETING!
COPYRIGHT:
You may not sell my pattern or claim it as your own.
You may make items to sell (i.e. on Etsy, at craft fairs) from my pattern but I ask that you link back to my blog handmadebyraine.com and provide credit for the pattern.
You are welcome to share my pattern on social media as long as you link back directly to my blog post (providing the link). No copy & paste of my pattern will be allowed under any circumstances.
Some links are affiliate, meaning I’ll make a small commission if you make a purchase, but this is at no cost to you.


