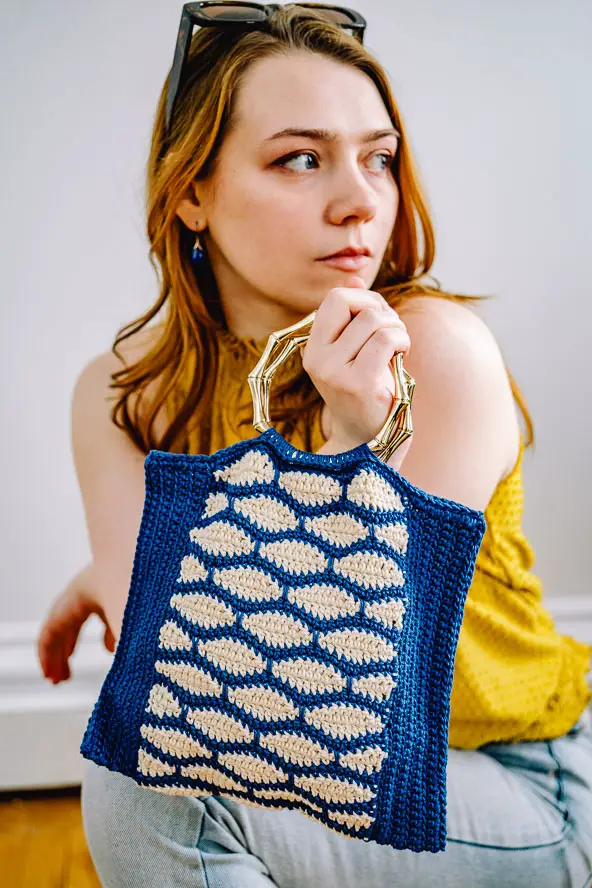
There are never enough cute bags and totes, let alone handmade ones. This new Basketweave Laptop Bag is fairly easy to make and it has a special feature – it’s lined with EMF defense silver fabric.


The Basketweave Laptop Bag is made with cotton yarn which makes it really sturdy. You will learn several special crochet stitches in addition to the basketweave stitch. The bag fits 14″ laptop.
This tutorial comes with the bonus for all of you who would like to make your bag sturdier with lining. You can use any kind of lining fabric but I use the special Faraday Silver fabric.


The purpose of this fabric is to block the harmful EMF waves and it’s very suitable to use as a bag lining because it’s elastic polyester, lightweight and easy to work with.
Important! The silver fabric is not intended for direct contact with skin and it should be handled with protective gloves.
You will also learn to attach two different types of handles. The first ones are the adjustable purse straps of yellow bag and the second ones are stitchable handles of blue bag.
VIDEO TUTORIAL OF BASKETWEAVE LAPTOP BAG
WRITTEN PATTERN OF BASKETWEAVE LAPTOP BAG
If you prefer ad-free printable pattern, you can get it on:
I use Lily Sugar’n Cream cotton yarn. The blue one is made with Light Blue cotton (120 yards per ball) and you will need 4 balls. The yellow one is made with Bernat Handicrafter DeLux cotton color Gold (236 yards per ball) and you will need 2 balls. Crochet hook is size 4.5 mm.
You will also need tapestry needles, stitch marker, fine sewing needle and thread, pins and 1-inch button.
Abbreviations:
ch = chain
R = round
sc = single crochet
sl st = slip stitch
blo = back loop only
dc = double crochet
fpdc = front post double crochet
bpdc = back post double crochet
Special stitches:
fpdc = yarn over, insert hook from front to back to front again around the post of next st, yarn over, pull the loop through st – 3 loops on hook, (yarn over and pull through 2 loops on hook) twice
bpdc = yarn over, insert hook from back to front to back again around the post of next st, yarn over, pull the loop through st – 3 loops on hook, (yarn over and pull through 2 loops on hook) twice
spike stitch = insert hook in space below sc on previous round, yarn over, pull up long loop, yarn over, pull through 2 loops
- Ch 41.
- R1 – sc in 2nd ch from hook and in upper loop of each ch (40 sc), then sc in lower loop of each ch on opposite side (40sc), total 80 sc, sl st in 1st sc.
- R2 – ch 1, sc blo in each sc, sl st in 1st sc.
- R3 – sl st in each sc, sl st in blo of 1st sl st.
- R4 – ch 3 (counts as 1st dc), dc in upper loops of each sl st (the two sl st loops will remain unworked in front).
- Basketweave pattern:
- R5 – ch 1 (doesn’t count as st here and throughout), *fpdc 1 in each next 4 dc, bpdc 1 in each next 4 dc, repeat from*, sl st in 1st fpdc.
- R6 – ch 1, *fpdc 1 in each next 4 fpdc, bpdc 1 in each next 4 bpdc, repeat from*, sl st in 1st fpdc.
- R7 – repeat R6.
- R8 – ch 1, *bpdc 1 in each next 4 fpdc, fpdc 1 in each next 4 bpdc, repeat from*, sl st in 1st bpdc.
- R9 – ch 1, *bpdc 1 in each next 4 bpdc, fpdc 1 in each next 4 fpdc, repeat from*, sl st in 1st bpdc.
- R10 – repeat R9.
- R11-37 – repeat R5 R6 R7 and R8 R9 R10.
- 1st edge option (yellow bag with handle holes):
- R1 – ch 1, sc 1 in each next 8 st, ch 3, skip 3 st, sc 1 in each next 18 st, ch 3, skip 3 st, sc 1 in each next 16 st, ch 3, skip 3 st, sc 1 in each next 18 st, ch 3, skip 3 st, sc 1 in each next 8 st, sl st in 1st sc.
- R2 – ch 1, sc 1 in each next 7 sc, spike stitch in next sc, sc 2 in ch3-space, spike stitch in next sc, sc 1 in each next 16 sc, spike stitch, sc 2 in ch3-space, spike stitch, sc 1 in each next 14 sc, spike stitch, sc 2 in ch3-space, spike stitch, sc 1 in each next 16 sc, spike stitch, sc 2 in ch3-space, spike stitch, sc 1 in each next 7 sc, sl st in 1st sc.
- R3-5 – ch 1, sc in each sc (76 sc), sl st in 1st sc.
- R6 – ch 1, sc 1 in each next 19 sc, ch 12 for button loop, sc in next sc, turn work clockwise, sc 14 in ch-loop, spike stitch in sc where ch12-loop started, turn work again clockwise, sl st in each 14 sc, sc in same sc where you sc after 12 ch, sc 1 in each next sc, sl st in 1st sc, fasten off, cut off yarn.
- 2nd edge option (blue bag):
- R1-2 – ch 1, sc in each st (80 sc), sl st in 1st sc.
- R3 – ch 1, sc2tog in next 2 sc, sc 1 in each next 38, sc2tog in next 2 sc, sc 1 in each next 38 (78 sc), sl st in 1st sc.
- R4 – ch 1, sc in each sc, sl st in 1st sc.
- R5 – ch 1, sc2tog in next 2 sc, sc 1 in each next 37, sc2tog in next 2 sc, sc 1 in each next 37 (76 sc), sl st in 1st sc.
- R6 – ch 1, sc 1 in each next 19 sc, ch 12 for button loop, sc in next sc, turn work clockwise, sc 14 in ch-loop, spike stitch in sc where ch12-loop started, turn work again clockwise, sl st in each 14 sc, sc in same sc where you sc after 12 ch, sc 1 in each next sc, sl st in 1st sc, fasten off, cut off yarn.
- Fininshing the bag:
- Attach the handles by either inserting them through holes (yellow bag) or stitching with tapestry needle (blue bag).
- Sew on the button, in space between 2nd and 3rd sc round of edge.
- Turn the bag inside out and attach the lining fabric onto the bag with pins starting with upper edge and finishing with sides (please see video for illustration).
- With fine sewing needle and thread stitch the lining along the upper edge, then along both sides, inserting needle alternatively through crochet stitches and fabric.
If you enjoy crocheting bags, check out all my bag patterns.
Happy crocheting!
COPYRIGHT:
You may not sell my pattern or claim it as your own.
You may make items to sell (i.e. on Etsy, at craft fairs) from my pattern but I ask that you link back to my blog handmadebyraine.com and provide credit for the pattern.
You are welcome to share my pattern on social media as long as you link back directly to my blog post (providing the link). No copy & paste of my pattern will be allowed under any circumstances.
Some links are affiliate, meaning I’ll make a small commission if you make a purchase, but this is at no cost to you.


3 Comments